Vue জীবনচক্র হুক
Vue-তে লাইফসাইকেল হুকগুলি একটি উপাদানের জীবনচক্রের পর্যায় যেখানে আমরা জিনিসগুলি ঘটানোর জন্য কোড যোগ করতে পারি।
জীবনচক্র হুক
প্রতিবার একটি উপাদান তার জীবনচক্রের একটি নতুন পর্যায়ে পৌঁছায়, একটি নির্দিষ্ট ফাংশন কার্যকর করা হয় এবং আমরা সেই ফাংশনে কোড যোগ করতে পারি। এই ধরনের ফাংশনকে লাইফসাইকেল হুক বলা হয় কারণ আমরা সেই পর্যায়ে আমাদের কোডকে "হুক" করতে পারি।
সমস্ত জীবনচক্রের হুকগুলির একটি উপাদান রয়েছে:
beforeCreate
created
beforeMount
mounted
beforeUpdate
updated
beforeUnmount
unmounted
errorCaptured
renderTracked
renderTriggered
activated
deactivated
serverPrefetch
'আগে তৈরি করুন' হুক
বিফোর ক্রিয়েট লাইফসাইকেল হুকটি কম্পোনেন্ট শুরু হওয়ার আগে ঘটে, তাই এটি Vue কম্পোনেন্টের ডেটা, গণনা করা বৈশিষ্ট্য, পদ্ধতি এবং ইভেন্ট শ্রোতাদের সেট করার আগে।
বিফোর ক্রিয়েট হুক উদাহরণস্বরূপ একটি গ্লোবাল ইভেন্ট লিসেনার সেট আপ করতে ব্যবহার করা যেতে পারে, তবে আপনার বিফোর ক্রিয়েট লাইফসাইকেল হুক থেকে কম্পোনেন্টের নিজস্ব উপাদানগুলি অ্যাক্সেস করার চেষ্টা করা এড়ানো উচিত কারণ সেগুলি এখনও তৈরি করা হয়নি৷
এছাড়াও, beforeCreate লাইফসাইকেল হুক থেকে DOM উপাদানগুলি অ্যাক্সেস করার চেষ্টা করা অর্থহীন কারণ এগুলি শুধুমাত্র উপাদান মাউন্ট করার পরে তৈরি করা হয়।
উদাহরণ
আপনার নিজস্ব Vue সার্ভার পান
<template>
    <h2>Component</h2>
    <p>This is the component</p>
    <p id="pResult">{{ text }}</p>
</template>

<script>
export default {
    data() {
        return {
            text: '...'
        }
    },
  beforeCreate() {
        this.text = 'initial text'; // This line has no effect
    console.log("beforeCreate: The component is not created yet.");
  }
}
</script><template>
<h1>The 'beforeCreate' Lifecycle Hook</h1>
<p>We can see the console.log() message from 'beforeCreate' lifecycle hook, but there is no effect from the text change we try to do to the Vue data property, because the Vue data property is not created yet.</p>
<button @click="this.activeComp = !this.activeComp">Add/Remove Component</button>
<div>
<comp-one v-if="activeComp"></comp-one>
</div>
</template>
<script>
export default {
data() {
return {
activeComp: false
}
}
}
</script>
<style>
#app > div {
border: dashed black 1px;
border-radius: 10px;
padding: 10px;
margin-top: 10px;
background-color: lightgreen;
}
#pResult {
background-color: lightcoral;
display: inline-block;
}
</style>টিপ:
উপরের উদাহরণে, CompOne.vue-এ লাইন 15 এর কোন প্রভাব নেই কারণ সেই লাইনে আমরা Vue ডেটা প্রপার্টির ভিতরে টেক্সট পরিবর্তন করার চেষ্টা করছি, কিন্তু Vue ডেটা প্রপার্টি আসলে এখনও তৈরি করা হয়নি। এছাড়াও, 16 লাইনে console.log() কলের ফলাফল দেখতে ব্রাউজার কনসোল খুলতে ভুলবেন না।
'সৃষ্ট' হুক
তৈরি লাইফসাইকেল হুক কম্পোনেন্ট শুরু হওয়ার পরে ঘটে, তাই Vue ইতিমধ্যেই কম্পোনেন্টের ডেটা, গণনা করা বৈশিষ্ট্য, পদ্ধতি এবং ইভেন্ট শ্রোতাদের সেট করেছে।
যেহেতু কম্পোনেন্ট মাউন্ট না হওয়া পর্যন্ত DOM উপাদানগুলি অ্যাক্সেস করা যাবে না, তাই আমাদের তৈরি করা জীবনচক্র হুক থেকে DOM উপাদানগুলি অ্যাক্সেস করার চেষ্টা করা এড়ানো উচিত।
তৈরি লাইফসাইকেল হুক HTTP অনুরোধের সাথে ডেটা পুনরুদ্ধার করতে বা প্রাথমিক ডেটা মান সেট করতে ব্যবহার করা যেতে পারে। নীচের উদাহরণের মতো, ডেটা বৈশিষ্ট্য 'টেক্সট' একটি প্রাথমিক মান প্রদান করে:
উদাহরণ
<template>
    <h2>Component</h2>
    <p>This is the component</p>
    <p id="pResult">{{ text }}</p>
</template>

<script>
export default {
    data() {
        return {
            text: '...'
        }
    },
  created() {
        this.text = 'initial text';
    console.log("created: The component just got created.");
  }
}
</script><template>
<h1>The 'created' Lifecycle Hook</h1>
<p>We can see the console.log() message from 'created' lifecycle hook, and the text change we try to do to the Vue data property works, because the Vue data property is already created at this stage.</p>
<button @click="this.activeComp = !this.activeComp">Add/Remove Component</button>
<div>
<comp-one v-if="activeComp"></comp-one>
</div>
</template>
<script>
export default {
data() {
return {
activeComp: false
}
}
}
</script>
<style>
#app > div {
border: dashed black 1px;
border-radius: 10px;
padding: 10px;
margin-top: 10px;
background-color: lightgreen;
}
#pResult {
background-color: lightcoral;
display: inline-block;
}
</style>'বিফোরমাউন্ট' হুক
বিফোরমাউন্ট লাইফসাইকেল হুক কম্পোনেন্ট মাউন্ট করার ঠিক আগে ঘটে এবং তাই DOM-এ কম্পোনেন্ট যোগ করার ঠিক আগে।
যেহেতু কম্পোনেন্ট মাউন্ট করা না হওয়া পর্যন্ত DOM উপাদানগুলি অ্যাক্সেস করা যাবে না, তাই আমাদের বিফোরমাউন্ট লাইফসাইকেল হুক থেকে DOM উপাদানগুলি অ্যাক্সেস করার চেষ্টা করা এড়ানো উচিত।
নীচের উদাহরণটি দেখায় যে DOM উপাদানগুলি এখনও কম্পোনেন্টে অ্যাক্সেসযোগ্য নয়, CompOne.vue এর লাইন 11 কাজ করে না এবং ব্রাউজার কনসোলে একটি ত্রুটি তৈরি করে:
উদাহরণ
<template>
    <h2>Component</h2>
    <p>This is the component</p>
    <p ref="pEl" id="pEl">We try to access this text from the 'beforeMount' hook.</p>
</template>

<script>
export default {
  beforeMount() {
    console.log("beforeMount: This is just before the component is mounted.");
    this.$refs.pEl.innerHTML = "Hello World!"; // <-- We cannot reach the 'pEl' DOM element at this stage
  }
}
</script><template>
<h1>The 'beforeMount' Lifecycle Hook</h1>
<p>We can see the console.log() message from the 'beforeMount' lifecycle hook, but the text change we try to do to the 'pEl' paragraph DOM element does not work, because the 'pEl' paragraph DOM element does not exist yet at this stage.</p>
<button @click="this.activeComp = !this.activeComp">Add/Remove Component</button>
<div>
<comp-one v-if="activeComp"></comp-one>
</div>
</template>
<script>
export default {
data() {
return {
activeComp: false
}
}
}
</script>
<style>
#app > div {
border: dashed black 1px;
border-radius: 10px;
padding: 10px;
margin-top: 10px;
background-color: lightgreen;
}
#pEl {
background-color: lightcoral;
display: inline-block;
}
</style>'মাউন্ট করা' হুক
DOM ট্রিতে একটি কম্পোনেন্ট যোগ করার সাথে সাথে মাউন্টেড() ফাংশন বলা হয় এবং আমরা সেই সময়ে আমাদের কোড যোগ করতে পারি।
রেফ অ্যাট্রিবিউট এবং $refs অবজেক্ট ব্যবহার করে কম্পোনেন্টের মালিকানাধীন DOM উপাদানগুলির সাথে কাজ করার এটি প্রথম সুযোগ যা আমরা নীচের দ্বিতীয় উদাহরণে করি।
উদাহরণ 1
<template>
  <h2>Component</h2>
  <p>Right after this component is added to the DOM, the mounted() function is called and we can add code to that mounted() function. In this example, an alert popup box appears after this component is mounted.</p>
  <p><strong>Note:</strong> The reason that the alert is visible before the component is visible is because the alert is called before the browser gets to render the component to the screen.</p>
</template>

<script>
export default {
  mounted() {
    alert("The component is mounted!");
  }
}
</script><template>
<h1>The 'mounted' Lifecycle Hook</h1>
<button @click="this.activeComp = !this.activeComp">Create component</button>
<div>
<comp-one v-if="activeComp"></comp-one>
</div>
</template>
<script>
export default {
data() {
return {
activeComp: false
}
}
}
</script>
<style scoped>
div {
border: dashed black 1px;
border-radius: 10px;
padding: 20px;
margin: 10px;
width: 400px;
background-color: lightgreen;
}
</style>দ্রষ্টব্য:
DOM-এ কম্পোনেন্ট যোগ করার পরে মাউন্ট করা ফেজটি ঘটে, কিন্তু উপরের উদাহরণে alert() কম্পোনেন্ট দৃশ্যমান হওয়ার আগে দৃশ্যমান হয়। এর কারণ হল যে কম্পোনেন্টটি প্রথমে DOM এ যোগ করা হয়, কিন্তু ব্রাউজার স্ক্রীনে কম্পোনেন্ট রেন্ডার করার আগে মাউন্ট করা ফেজটি ঘটে এবং alert() দৃশ্যমান হয় এবং ব্রাউজারটিকে কম্পোনেন্ট রেন্ডার করা বন্ধ করে দেয়।
<template>
  <h2>Form Component</h2>
  <p>When this component is added to the DOM tree, the mounted() function is called, and we put the cursor inside the input element.</p>
  <form @submit.prevent>
    <label>
      <p>
        Name: <br>
        <input type="text" ref="inpName">
      </p>
    </label>
    <label>
      <p>
        Age: <br>
        <input type="number">
      </p>
    </label>
    <button>Submit</button>
  </form>
  <p>(This form does not work, it is only here to show the mounted lifecycle hook.)</p>
</template>

<script>
  export default {
    mounted() {
      this.$refs.inpName.focus();
    }
  }
</script>
'আগে আপডেট' হুক
বিফোরআপডেট লাইফসাইকেল হুক বলা হয় যখনই আমাদের কম্পোনেন্টের ডেটাতে পরিবর্তন হয়, কিন্তু আপডেটটি স্ক্রিনে রেন্ডার হওয়ার আগে। বিফোরআপডেট লাইফসাইকেল হুক আপডেট করা লাইফসাইকেল হুকের ঠিক আগে ঘটে।
BeforeUpdate হুক সম্পর্কে বিশেষ কিছু হল যে আমরা একটি নতুন আপডেট ট্রিগার না করেই অ্যাপ্লিকেশনটিতে পরিবর্তন করতে পারি, এইভাবে অন্যথায় অন্তহীন লুপ এড়ানো। এই কারণেই আপনার আপডেট করা লাইফসাইকেল হুকে অ্যাপ্লিকেশনটিতে পরিবর্তন করা উচিত নয়, কারণ সেই হুকের সাহায্যে একটি অন্তহীন লুপ তৈরি করা হয়। নীচে থেকে তৃতীয় উদাহরণটি দেখুন, লাল রঙে।
উদাহরণ
beforeUpdate() ফাংশনটি নথিতে একটি <li> ট্যাগ যোগ করে তা নির্দেশ করে যে beforeUpdate() ফাংশনটি চলছে।
<template>
  <h2>Component</h2>
  <p>This is the component</p>
</template><template>
<h1>The 'beforeUpdate' Lifecycle Hook</h1>
<p>Whenever there is a change in our page, the application is 'updated' and the 'beforeUpdate' hook happens just before that.</p>
<p>It is safe to modify our page in the 'beforeUpdate' hook like we do here, but if we modify our page in the 'updated' hook, we will generate an infinite loop.</p>
<button @click="this.activeComp = !this.activeComp">Add/Remove Component</button>
<div>
<comp-one v-if="activeComp"></comp-one>
</div>
<ol ref="divLog"></ol>
</template>
<script>
export default {
data() {
return {
activeComp: true
}
},
beforeUpdate() {
this.$refs.divLog.innerHTML += "<li>beforeUpdate: This happened just before the 'updated' hook.</li>";
}
}
</script>
<style>
#app > div {
border: dashed black 1px;
border-radius: 10px;
padding: 10px;
margin-top: 10px;
background-color: lightgreen;
}
</style>'আপডেট করা' হুক
আমাদের কম্পোনেন্ট তার DOM ট্রি আপডেট করার পর আপডেট করা লাইফসাইকেল হুক বলা হয়।
উদাহরণ 1
আপডেটেড() ফাংশন console.log() এ একটি বার্তা লেখে। পৃষ্ঠাটি রিফ্রেশ করার সময় এটি ঘটে, এই উদাহরণে প্রতিবার উপাদানটি যোগ করা বা সরানো হয়।
<template>
  <h2>Component</h2>
  <p>This is the component</p>
</template><template>
<h1>The 'updated' Lifecycle Hook</h1>
<p>Whenever there is a change in our page, the application is updated and the updated() function is called. In this example we use console.log() in the updated() function that runs when our application is updated.</p>
<button @click="this.activeComp = !this.activeComp">Add/Remove Component</button>
<div>
<comp-one v-if="activeComp"></comp-one>
</div>
</template>
<script>
export default {
data() {
return {
activeComp: true
}
},
updated() {
console.log("The component is updated!");
}
}
</script>
<style>
#app {
max-width: 450px;
}
#app > div {
border: dashed black 1px;
border-radius: 10px;
padding: 10px;
margin-top: 10px;
width: 80%;
background-color: lightgreen;
}
</style>10 বার "অ্যাড/রিমুভ কম্পোনেন্ট" বোতামে ক্লিক করার পর আপনি ব্রাউজার কনসোলে ফলাফল দেখতে পাবেন:
চিত্র 28: ব্রাউজার কনসোল
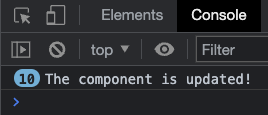
ব্রাউজার কনসোল স্ক্রিনশট - 10 বার "অ্যাড/রিমুভ কম্পোনেন্ট" বোতামে ক্লিক করার পর
সতর্কতা:
আপডেট করা লাইফসাইকেল হুক কল করা হলে পৃষ্ঠা পরিবর্তন করার বিষয়ে আমাদের সতর্কতা অবলম্বন করতে হবে, কারণ পৃষ্ঠাটি বারবার আপডেট হবে, একটি অন্তহীন লুপ তৈরি করবে।
<template>
  <h2>Component</h2>
  <p>This is the component</p>
</template><template>
<h1>The 'updated' Lifecycle Hook</h1>
<p>Whenever there is a change in our page, the application is updated and the updated() function is called.</p>
<p>The first change that causes the updated hook to be called is when we remove the component by clicking the button. When this happens, the update() function adds text to the last paragraph, which in turn updates the page again and again.</p>
<button @click="this.activeComp = !this.activeComp">Add/Remove Component</button>
<div>
<comp-one v-if="activeComp"></comp-one>
</div>
<div>{{ text }}</div>
</template>
<script>
export default {
data() {
return {
activeComp: true,
text: "Hello, "
}
},
updated() {
this.text += "hi, ";
}
}
</script>
<style>
#app {
max-width: 450px;
}
#app > div {
border: dashed black 1px;
border-radius: 10px;
padding: 10px;
margin-top: 10px;
width: 80%;
background-color: lightgreen;
}
</style>আপনি যখন আপনার মেশিনে স্থানীয়ভাবে ডেভ মোডে উপরের কোডটি চালান, তখন Chrome ব্রাউজার কনসোল সতর্কতাটি এইরকম দেখায়:
চিত্র 28: ব্রাউজার কনসোল
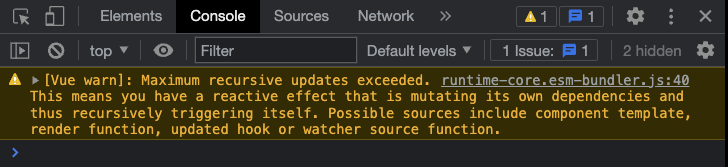
ব্রাউজার কনসোল স্ক্রিনশট - 10 বার "অ্যাড/রিমুভ কম্পোনেন্ট" বোতামে ক্লিক করার পর
'foreUnmount' হুক
ডিওএম থেকে একটি উপাদান সরানোর ঠিক আগে আগে আনমাউন্ট লাইফসাইকেল হুক বলা হয়।
আমরা নীচের উদাহরণে দেখতে পাচ্ছি, আগে আনমাউন্ট হুক এখনও DOM-এর উপাদান উপাদানগুলি অ্যাক্সেস করতে পারে।
উদাহরণ
<template>
  <h2>Component</h2>
  <p ref="pEl">Strawberries!</p>
</template>

<script>
export default {
  beforeUnmount() {
    alert("beforeUnmount: The text inside the p-tag is: " + this.$refs.pEl.innerHTML);
  }
}
</script><template>
<h1>Lifecycle Hooks</h1>
<button @click="this.activeComp = !this.activeComp">{{ btnText }}</button>
<div>
<comp-one v-if="activeComp"></comp-one>
</div>
</template>
<script>
export default {
data() {
return {
activeComp: true
}
},
computed: {
btnText() {
if(this.activeComp) {
return 'Remove component'
}
else {
return 'Add component'
}
}
}
}
</script>
<style scoped>
div {
border: dashed black 1px;
border-radius: 10px;
padding: 20px;
margin: 10px;
width: 400px;
background-color: lightgreen;
}
</style>'আনমাউন্ট করা' হুক
DOM থেকে একটি উপাদান সরানোর পরে আনমাউন্ট করা লাইফসাইকেল হুক বলা হয়।
এই হুকটি উদাহরণস্বরূপ ইভেন্ট শ্রোতাদের সরাতে বা টাইমার বা বিরতি বাতিল করতে ব্যবহার করা যেতে পারে।
যখন একটি কম্পোনেন্ট আনমাউন্ট করা হয়, তখন আনমাউন্ট করা() ফাংশন বলা হয় এবং আমরা এতে আমাদের কোড যোগ করতে পারি:
উদাহরণ
<template>
  <h2>Component</h2>
  <p>When this component is removed from the DOM tree, the unmounted() function is called and we can add code to that function. In this example we create an alert popup box when this component is removed.</p>
</template>

<script>
export default {
  unmounted() {
    alert("The component is removed (unmounted)!");
  }
}
</script><template>
<h1>Lifecycle Hooks</h1>
<button @click="this.activeComp = !this.activeComp">{{ btnText }}</button>
<div>
<comp-one v-if="activeComp"></comp-one>
</div>
</template>
<script>
export default {
data() {
return {
activeComp: true
}
},
computed: {
btnText() {
if(this.activeComp) {
return 'Remove component'
}
else {
return 'Add component'
}
}
}
}
</script>
<style scoped>
div {
border: dashed black 1px;
border-radius: 10px;
padding: 20px;
margin: 10px;
width: 400px;
background-color: lightgreen;
}
</style>দ্রষ্টব্য:
DOM থেকে কম্পোনেন্ট সরানোর পরে আনমাউন্ট করা ফেজটি ঘটে, কিন্তু উপরের উদাহরণে alert() কম্পোনেন্টটি অদৃশ্য হয়ে যাওয়ার আগে দৃশ্যমান হয়। এর কারণ হল যে কম্পোনেন্টটি প্রথমে DOM থেকে সরানো হয়, কিন্তু ব্রাউজার স্ক্রীনে কম্পোনেন্ট অপসারণের রেন্ডার করার আগে, আনমাউন্ট করা ফেজটি ঘটে এবং alert() দৃশ্যমান হয় এবং ব্রাউজারটিকে কম্পোনেন্ট প্রদর্শন করা বন্ধ করে দেয়।
'errorCaptured' হুক
এররক্যাপচারড লাইফসাইকেল হুক বলা হয় যখন একটি শিশু/বংশীয় উপাদানে একটি ত্রুটি ঘটে।
এই হুকটি ব্যবহারকারীকে ত্রুটি পরিচালনা, লগিং বা ত্রুটি প্রদর্শনের জন্য ব্যবহার করা যেতে পারে।
উদাহরণ 1
<template>
  <h2>Component</h2>
  <p>This is the component</p>
  <button @click="generateError">Generate Error</button>
</template>

<script>
export default {
  methods: {
    generateError() {
      this.$refs.objEl.innerHTML = "hi";
    }
  }
}
</script><template>
<h1>The 'errorCaptured' Lifecycle Hook</h1>
<p>Whenever there is an error in a child component, the errorCaptured() function is called on the parent.</p>
<p>When the button inside the component is clicked, a method will run that tries to do changes to a $refs object that does not exist. This creates an error in the component that triggers the 'errorCaptured' lifecycle hook in the parent, and an alert box is displayed with information about the error.</p>
<p>After clicking "Ok" in the alert box you can see the error in the browser console.</p>
<div>
<comp-one></comp-one>
</div>
</template>
<script>
export default {
errorCaptured() {
alert("An error occurred");
}
}
</script>
<style>
#app > div {
border: dashed black 1px;
border-radius: 10px;
padding: 10px;
margin-top: 10px;
background-color: lightgreen;
}
</style>ত্রুটির তথ্য errorCaptured() ফাংশনের আর্গুমেন্ট হিসাবে ক্যাপচার করা যেতে পারে এবং এই আর্গুমেন্টগুলি হল:
- ত্রুটি
- যে উপাদানটি ত্রুটিটি ট্রিগার করেছে৷
- ত্রুটি উৎস প্রকার
<template>
  <h2>Component</h2>
  <p>This is the component</p>
  <button @click="generateError">Generate Error</button>
</template>

<script>
export default {
  methods: {
    generateError() {
      this.$refs.objEl.innerHTML = "hi";
    }
  }
}
</script><template>
<h1>The 'errorCaptured' Lifecycle Hook</h1>
<p>Whenever there is an error in a child component, the errorCaptured() function is called on the parent.</p>
<p>Open the browser console to see the captured error details.</p>
<div>
<comp-one></comp-one>
</div>
</template>
<script>
export default {
errorCaptured(error,compInst,errorInfo) {
console.log("error: ", error);
console.log("compInst: ", compInst);
console.log("errorInfo: ", errorInfo);
}
}
</script>
<style>
#app > div {
border: dashed black 1px;
border-radius: 10px;
padding: 10px;
margin-top: 10px;
background-color: lightgreen;
}
</style>'renderTracked' এবং 'renderTriggered' লাইফসাইকেল হুক
রেন্ডারট্র্যাকড হুক চলে যখন একটি রেন্ডার ফাংশন একটি প্রতিক্রিয়াশীল উপাদান ট্র্যাক বা ট্র্যাক করতে সেট করা হয়। রেন্ডারট্র্যাকড হুক সাধারণত সঞ্চালিত হয় যখন একটি প্রতিক্রিয়াশীল উপাদান শুরু হয়।
রেন্ডারট্রিগারড হুক চলে যখন এই ধরনের একটি নিরীক্ষণ করা প্রতিক্রিয়াশীল উপাদান পরিবর্তিত হয়, এইভাবে একটি নতুন রেন্ডার ট্রিগার করে যাতে স্ক্রিনটি সর্বশেষ পরিবর্তনগুলির সাথে আপডেট হয়।
একটি প্রতিক্রিয়াশীল উপাদান এমন একটি উপাদান যা পরিবর্তিত হয়।
রেন্ডার ফাংশন হল Vue দ্বারা সংকলিত একটি ফাংশন যা প্রতিক্রিয়াশীল উপাদানগুলি নিরীক্ষণ করে। যখন একটি প্রতিক্রিয়াশীল উপাদান পরিবর্তিত হয়, রেন্ডার ফাংশনটি ট্রিগার হয় এবং অ্যাপ্লিকেশনটিকে স্ক্রিনে পুনরায় রেন্ডার করে।
renderTracked এবং renderTriggered পদ্ধতিগুলি শুধুমাত্র ডিবাগিংয়ের জন্য ব্যবহার করা হয় এবং শুধুমাত্র বিকাশ মোডে উপলব্ধ।
উদাহরণ
<template>
  <h2>Component One</h2>
  <p>This is a component.</p>
  <button @click="counter++">Add One</button>
  <p>{{ counter }}</p>
</template>

<script>
export default {
  data() {
    return {
      counter: 0
    }
  },
  renderTracked(evt) {
    console.log("renderTracked: ",evt);
    alert("renderTracked");
  },
  renderTriggered(evt) {
    console.log("renderTriggered: ",evt)
    alert("renderTriggered");
  }
}
</script><template>
<h1>The 'renderTracked' and 'renderTriggered' Lifecycle Hooks</h1>
<p>The 'renderTracked' and 'renderTriggered' lifecycle hooks are used for debugging.</p>
<p><mark>This example only works in development mode, so to see the hooks run, you must copy this code and run it on you own computer in development mode.</mark></p>
<div>
<comp-one></comp-one>
</div>
</template>
<style scoped>
div {
border: dashed black 1px;
border-radius: 10px;
padding: 20px;
margin-top: 10px;
background-color: lightgreen;
}
</style>গুরুত্বপূর্ণ নোট:
renderTracked এবং renderTriggered হুকগুলি থেকে alert() এবং console.log() দেখতে, আপনাকে নীচের উদাহরণে কোডটি আপনার কম্পিউটারে অনুলিপি করতে হবে এবং অ্যাপ্লিকেশনটিকে বিকাশ মোডে চালাতে হবে৷
দ্রষ্টব্য:
উপরের উদাহরণের কোডটি আপনার কম্পিউটারে অনুলিপি করা এবং ডেভেলপমেন্ট মোডে চালানোর জন্য বোঝানো হয়েছে, কারণ রেন্ডারট্র্যাকড এবং রেন্ডারট্রিগারড ফাংশনগুলি শুধুমাত্র ডেভেলপমেন্ট মোডে কাজ করে।
'সক্রিয়' এবং 'নিষ্ক্রিয়' লাইফসাইকেল হুক
আমরা এই পৃষ্ঠায় উপরে দেখতে পাচ্ছি, DOM থেকে একটি উপাদান সরানো বা যোগ করা হলে সেখানে মাউন্ট করা এবং আনমাউন্ট করা লাইফসাইকেল হুক রয়েছে।
সক্রিয় এবং নিষ্ক্রিয় জীবনচক্রগুলি ঘটে যখন একটি ক্যাশড ডায়নামিক উপাদান যোগ করা বা সরানো হয়, কিন্তু DOM থেকে নয়। নিচের উদাহরণে <KeepAlive> ট্যাগটি ডায়নামিক কম্পোনেন্ট ক্যাশে ব্যবহার করা হয়।
উদাহরণ
<template>
  <h2>Component</h2>
  <p>Below is a log with every time the 'activated', 'deactivated', 'mounted' or 'unmounted' hooks run.</p>
  <ol ref="olEl"></ol>
  <p>You can also see when these hooks run in the console.</p>
</template>

<script>
export default {
  mounted() {
    this.logHook("mounted");
  },
  unmounted() {
    this.logHook("unmounted");
  },
  activated() {
    this.logHook("activated");
  },
  deactivated() {
    this.logHook("deactivated");
  },
  methods: {
    logHook(hookName) {
      console.log(hookName);
      const liEl = document.createElement("li");
      liEl.innerHTML = hookName;
      this.$refs.olEl.appendChild(liEl);
    }
  }
}
</script>

<style>
  li {
    background-color: lightcoral;
    width: 5em;
  }
</style><template>
<h1>The 'activated' and 'deactivated' Lifecycle Hooks</h1>
<p>In this example for the 'activated' and 'deactivated' hooks we also see when and if the 'mounted' and 'unmounted' hooks are run.</p>
<button @click="this.activeComp = !this.activeComp">Include component</button>
<div>
<KeepAlive>
<comp-one v-if="activeComp"></comp-one>
</KeepAlive>
</div>
</template>
<script>
export default {
data() {
return {
activeComp: false
}
}
}
</script>
<style scoped>
div {
border: dashed black 1px;
border-radius: 10px;
padding: 20px;
margin-top: 10px;
background-color: lightgreen;
}
</style>'serverPrefetch' লাইফসাইকেল হুক
'serverPrefetch' হুক শুধুমাত্র সার্ভার-সাইড রেন্ডারিং (SSR) এর সময় কল করা হয়।
'সার্ভারপ্রিফেচ' হুকের জন্য একটি ব্যাখ্যা এবং উদাহরণ তৈরি করার জন্য অপেক্ষাকৃত দীর্ঘ ভূমিকা এবং সেটআপের প্রয়োজন হবে এবং এটি এই টিউটোরিয়ালের সুযোগের বাইরে।
ভিউ টিউটোরিয়াল
ব্যায়াম দিয়ে নিজেকে পরীক্ষা করুন
প্রশিক্ষণ:
DOM থেকে একটি উপাদান সরানোর ঠিক আগে ______ লাইফসাইকেল হুক বলা হয়।